Replacing a bike tire inner tube might seem difficult at first, but once you learn the steps, it becomes a simple and useful skill. Whether you ride for fun or use your bike every day, knowing how to fix a flat tire saves time, money, and hassle.
Many beginners worry about damaging their wheels or struggling with tight tires. This guide will show you exactly what to do, explain common mistakes, and help you feel confident tackling inner tube changes on any bike.
Why You Need To Replace A Bike Tire Inner Tube
Inner tubes are the part inside your tire that holds air. When you get a puncture, your bike loses air and becomes hard to ride. Most punctures happen from sharp objects, like glass or thorns, but sometimes inner tubes wear out over time. If you see your tire is flat, bumpy, or keeps losing air, it’s time for a replacement.
Cyclists replace inner tubes often. According to bicycle shops, most riders get a flat every 1,000 to 1,500 miles. If you ride in cities or on rough roads, flats happen even more often. Learning to change the tube means you don’t have to wait for help or pay for repairs every time.
What Tools And Supplies You Need
Before you start, gather these items:
- New inner tube (make sure it matches your tire size)
- Tire levers (plastic or metal tools to remove the tire)
- Bicycle pump (hand or floor pump)
- Patch kit (optional, for fixing small holes)
- Gloves (optional, to keep hands clean)
- Wrench (if your wheel uses bolts instead of quick-release)
Many beginners forget to check the inner tube size. Look on your tire sidewall for numbers like “700x28c” or “26×1. 95. ” The first number is the diameter, the second is the width. Your new tube must match both.
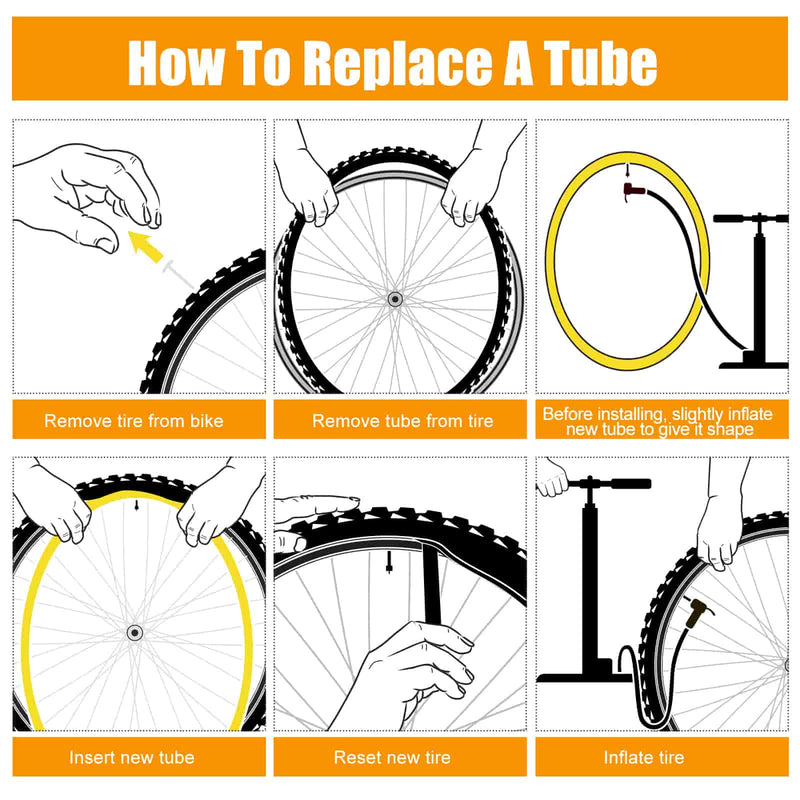
Step-by-step Guide To Replacing A Bike Tire Inner Tube
Changing an inner tube is a hands-on job. Follow these steps carefully for best results.
1. Remove The Wheel From The Bike
If you have quick-release levers, open them and lift the wheel off. For bolt-on wheels, use a wrench to loosen the nuts. If you’re fixing the front wheel, this is easy. For the rear wheel, shift your chain to the smallest gear before removing.
2. Deflate The Tire Completely
Press the valve to let all air out. This makes the tire loose and easy to work with. For Schrader valves (like car tires), press the metal pin inside. For Presta valves (narrow and long), unscrew the tip and press down.
3. Use Tire Levers To Remove The Tire
Insert one tire lever under the edge (bead) of the tire. Hook the lever onto a spoke to keep it in place. Use the second lever a few inches away and slide it around the rim. This pops the tire off one side of the wheel.
Pro tip: Most beginners struggle with tight tires. If your tire is hard to remove, squeeze the tire sides to loosen the bead before using levers. Don’t force metal levers—they can damage your rim.
4. Take Out The Old Inner Tube
Pull the tube out from under the tire, starting at the valve. Gently push the valve out of the hole in the rim. If the tube is stuck, check for dirt or rust around the valve.
5. Inspect The Tire And Rim
Look inside the tire for sharp objects, glass, or thorns. Run your fingers gently to feel for anything hidden. Also, check the rim tape (a strip covering the spoke holes) for damage.
Many beginners skip this step and get another flat soon after. Removing all sharp objects prevents repeat punctures.
6. Install The New Inner Tube
Pump a little air into the new tube so it holds its shape (not fully inflated). Place the valve through the rim hole. Lay the tube inside the tire all around the wheel.
7. Fit The Tire Back Onto The Rim
Use your hands to push the tire bead onto the rim. Start at the valve and move outward. If the last section is tight, pinch the tire sides together to loosen. Avoid using levers to put the tire back—they can pinch the tube.
8. Inflate The Tire
Pump air into the tire to the recommended pressure (check the sidewall for PSI numbers). If you hear hissing, stop and check for leaks. Make sure the tire is seated evenly on the rim.
9. Put The Wheel Back On The Bike
Place the wheel in the frame, tighten the quick-release or bolts, and spin the wheel to check alignment. If you changed the rear wheel, make sure the chain sits on the correct gear.
10. Final Check
Look at the tire from all sides. Make sure it’s not bulging or twisted. Spin the wheel and check for wobbles. If everything looks good, you’re ready to ride.
Common Mistakes And How To Avoid Them
Even experienced cyclists sometimes make errors. Here are some mistakes you should watch out for:
- Wrong tube size: Always check your tire numbers. Using the wrong size can cause leaks or damage.
- Pinching the tube: When putting the tire back, don’t use sharp levers. Pinched tubes burst when you inflate them.
- Skipping tire inspection: Always check for sharp objects inside the tire. Missing a thorn means another flat soon.
- Over-inflating: Too much air can burst the tube. Follow the recommended PSI.
- Valve misalignment: Make sure the valve is straight, not bent. Bent valves can break or leak.
Many beginners forget to check rim tape. Damaged rim tape lets spoke holes poke the tube, causing slow leaks. Always inspect rim tape before installing a new tube.
Understanding Bike Inner Tube Types
Choosing the right inner tube matters. Here’s a quick comparison of common tube types:
| Tube Type | Valve | Common Use | Durability |
|---|---|---|---|
| Butyl Rubber | Schrader/Presta | All bikes | High |
| Latex | Presta | Racing bikes | Medium |
| Self-sealing | Schrader/Presta | Commuters | High |
Butyl rubber tubes are most common. They last longer and are easy to fix. Latex tubes are lighter and faster but lose air faster. Self-sealing tubes have liquid inside that seals small holes while you ride.
How To Choose The Right Inner Tube For Your Bike
Picking the correct tube is important. Here’s what to check:
- Size: Match the diameter and width to your tire. If your tire says “27.5×2.1,” your tube must be “27.5” diameter, “2.1” width.
- Valve type: Most bikes use Schrader (wide) or Presta (narrow) valves. Make sure your pump fits the valve.
- Material: Butyl tubes work for most riders. Latex is for racing. Self-sealing is good if you ride where flats are common.
- Quality: Cheap tubes may burst or leak. Choose a trusted brand.
Many beginners buy tubes without checking valve length. If your rim is deep (like on racing bikes), you need a longer valve.

Credit: coevalchicago.com
Troubleshooting: If Your Tire Keeps Losing Air
Sometimes, you replace the tube but the tire still loses air. Here are some reasons:
- Valve leak: If the valve is loose or damaged, air escapes. Check for bubbles if you spray water on the valve.
- Rim tape damage: Holes in rim tape let spokes poke the tube.
- Hidden puncture: Some holes are hard to see. Inflate the tube and listen for air or dip it in water to spot bubbles.
- Faulty tube: Rarely, new tubes have defects. Try another tube if you keep getting flats.
If you can’t find the problem, visit a local bike shop. They have tools to check for hidden issues.
Quick Comparison: Schrader Vs Presta Valves
Understanding your valve type helps with repairs and pumping. Here’s a comparison:
| Valve Type | Diameter | Common Bikes | Pump Compatibility |
|---|---|---|---|
| Schrader | 8 mm | Mountain, city bikes | Standard car and bike pumps |
| Presta | 6 mm | Road, racing bikes | Special bike pumps, adapters |
Schrader valves are wider and easier to use. They work with most pumps, including at gas stations. Presta valves are slimmer and need a special pump or adapter.
Credit: coevalchicago.com
Tips For A Smooth Tube Replacement
Here are some extra pointers to make your tube change easier:
- Carry a spare tube: If you ride often, keep one in your bag.
- Practice at home: Try changing your tube indoors first. It’s easier than fixing a flat on the roadside.
- Use talcum powder: Sprinkle a little powder inside the tire before installing the tube. It reduces friction and helps prevent pinches.
- Keep your tools clean: Dirty tools can scratch your rim or tire.
- Check tire pressure: Riding with low pressure increases the risk of flats.
Many riders forget to check tire wear. If your tire is old, thin, or cracked, it’s better to replace both the tire and tube.
Real-life Example: City Bike Rider
Emma rides her bike to work every day in the city. She got three flats in one month from glass on the road. After learning to replace her inner tube, Emma started carrying a spare tube and tire levers. Now, when she gets a flat, she fixes it in ten minutes and never misses her commute.

Credit: www.youtube.com
How Often Should You Replace Bike Inner Tubes?
There’s no exact rule, but most cyclists replace tubes when they get a flat. Some replace them every 6–12 months for safety, especially if they ride daily. If your tube shows signs of age (cracks, leaks, or patches), it’s time for a new one.
According to Bicycling Magazine, regular replacement reduces the risk of sudden flats and keeps your bike running smoothly.
Frequently Asked Questions
What Should I Do If My Tire Is Hard To Remove?
If your tire is tight, squeeze the sides to loosen the bead before using tire levers. Work slowly, and avoid sharp metal levers. Sometimes warming the tire slightly helps.
Can I Patch An Old Tube Instead Of Replacing It?
Yes, you can patch small holes using a patch kit. However, patches may not last as long as a new tube, especially for larger punctures or on worn tubes.
How Do I Know If My Rim Tape Needs Replacing?
Look inside the rim for cracks, holes, or loose tape. If you see spoke holes or the tape looks damaged, replace it before installing a new tube.
Is It Safe To Use Self-sealing Inner Tubes?
Self-sealing tubes are safe and useful for preventing small punctures. They contain sealant that fills holes as you ride. However, they may not fix large cuts.
What Pressure Should I Inflate My Bike Tire To?
Check the tire sidewall for recommended PSI (usually 40–90 PSI for road bikes, 30–50 PSI for mountain bikes). Use a gauge to avoid over-inflating.
Replacing a bike tire inner tube is a skill every cyclist should learn. With the right tools and careful steps, you can fix flats quickly and enjoy smooth rides. Practicing at home and understanding your bike’s needs help you avoid common mistakes.
The next time you get a flat, you’ll be ready to handle it confidently—no need to wait for help or pay for repairs.